ruby-qml 
ruby-qml is a QML / Qt Quick wrapper for Ruby. It provides bindings between QML and Ruby and enables you to use Qt Quick-based GUI from Ruby.


![]()

What you can do with ruby-qml
- Develop desktop GUI applications only with Ruby and QML / JavaScript
- Easily combine codes written in C++ and Qt with your Ruby code
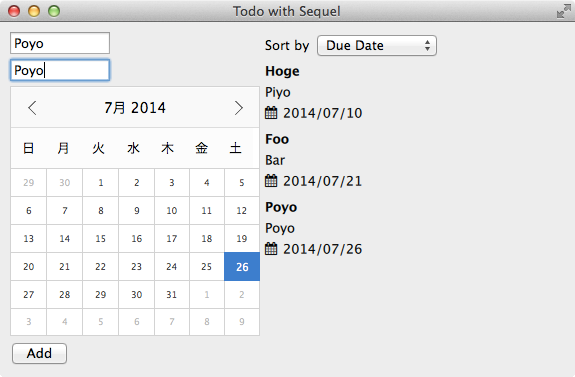
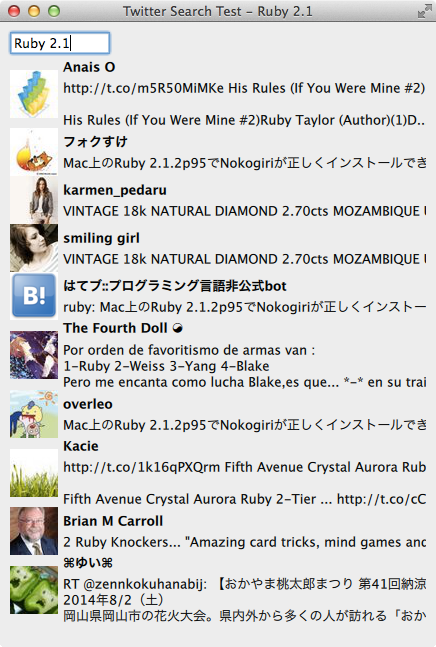
Gallery
Installation
Requirements
- Ruby 2.1 or later
- OS X or Linux
- Qt 5.4 or later
OS X with Homebrew
To install ruby-qml on OS X with Homebrew, run the following commands:
$ brew install qt5
$ gem install qml -- --with-qmake=$(brew --prefix qt5)/bin/qmake
Both libffi and Qt5 are keg-only in Homebrew, so you must specify their paths explicitly (or force linking).
If you use official Qt installation, for example:
$ gem install qml -- --with-qmake=$HOME/Qt/5.4/clang_64/bin/qmake
The Qt installation path ($HOME/Qt/5.4/clang_64 in this example) depends on your Qt installation configuration and Qt version.
General (OSX and Linux)
$ gem install qml
Options
-
--with-qmake=[dir]- Qt qmake executable path (optional).
Use Gemfile
Add this line to your Gemfile:
gem 'qml'
And then execute:
$ bundle install
To pass build options, use bundle config.
For example:
$ bundle config build.qml --with-qmake=$(brew --prefix qt5)/bin/qmake
The configuration will be saved in ~/.bundle/config.
Usage
Load QML file
The following code loads a QML file and shows an application window titled "Hello, world!".
require 'qml'

QML.run do |app|
  app.load_path Pathname(__FILE__) + '../main.qml'
end
// main.qml
import QtQuick 2.2
import QtQuick.Controls 1.1
ApplicationWindow {
visible: true
width: 200
height: 100
title: "Hello, world!"
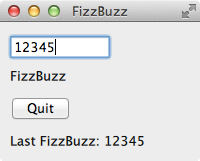
}Use Ruby class in QML
To make your class available to QML, include QML::Access and call register_to_qml.
By including QML::Access, you can also define properties and signals in Ruby classes like in QML.
Properties are used to bind data between QML and Ruby. Signals are used to provide the observer pattern-like notification from Ruby to QML.
# Ruby
class FizzBuzz
  include QML::Access
  register_to_qml under: "Example", version: "1.0"

  property(:input) { '0' }
  property(:result) { '' }
  signal :inputWasFizzBuzz, []

  on_changed :input do
    i = input.to_i
    self.result = case
    when i % 15 == 0
      inputWasFizzBuzz.emit
      "FizzBuzz"
    when i % 3 == 0
      "Fizz"
    when i % 5 == 0
      "Buzz"
    else
      i.to_s
    end
  end

  def quit
    puts "quitting..."
    QML.application.quit
  end
end
// QML - main.qml
import QtQuick 2.2
import QtQuick.Controls 1.1
import QtQuick.Layouts 1.1
import Example 1.0
ApplicationWindow {
visible: true
width: 200
height: 200
title: "FizzBuzz"
ColumnLayout {
anchors.fill: parent
anchors.margins: 10
TextField {
placeholderText: "Input"
text: "0"
id: textField
}
Text {
id: text
text: fizzBuzz.result
}
Button {
text: 'Quit'
onClicked: fizzBuzz.quit()
}
Text {
id: lastFizzBuzz
}
}
FizzBuzz {
id: fizzBuzz
input: textField.text
onInputWasFizzBuzz: lastFizzBuzz.text = "Last FizzBuzz: " + textField.text
}
}You can omit arguments of register_to_qml if they are obvious:
module Example
  VERSION = '1.0.0'

  class FizzBuzz
    include QML::Access
    register_to_qml

    ...
  end
end
Pass data to QML ListModels
To bind list data between QML ListView and Ruby, you can use ListModels.
QML::ListModel- the base class for ruby-qml list models.QML::ArrayModel- provides a simple list model implementation using Array.QML::QueryModel- for databases (like ActiveRecord, Sequel or something)
This example uses ArrayModel to provide list data for a QML ListView.
When the content of the ArrayModel is changed, the list view is also automatically updated.
Examples
# Ruby
class TodoController
  include QML::Access
  register_to_qml under: "Example", version: "1.0"

  property(:model) { QML::ArrayModel.new(:title, :description, :due_date) }

  def add(title, description, due_date)
    # Items of list models must be "Hash-like" (have #[] method to get columns)
    item = {
      title: title,
      description: description,
      due_date: due_date
    }
    model << item
  end
end
// QML
ListView {
model: todo.model
delegate: Text {
text: "Title: " + title + ", Description: " + description + ", Due date: " + due_date
}
}
TodoController {
id: todo
}Combile asynchronous operations
In QML, all UI-related operations are done synchronously in the event loop.
To set result of asynchronous operations to the UI, use QML.next_tick.
Examples
# Ruby
class HeavyTaskController
  include QML::Access
  register_to_qml under: "Example", version: "1.0"

  property(:result) { '' }

  def set_result(result)
    self.result = result
  end

  def start_heavy_task
    Thread.new do
      QML.next_tick do
        set_result do_heavy_task()
      end
    end
  end
end
// QML
Text {
text: controller.result
}
Button {
text: "Start!!"
onClicked: controller.start_heavy_task()
}
HeavyTaskController {
id: controller
}Value conversions between Ruby and QML JavaScript
Ruby to QML
| Ruby | QML/JavaScript |
|---|---|
| nil | null |
| true/false | boolean |
| Numeric | number |
| String/Symbol | string |
| Array | Array |
| Hash | plain Object |
| Proc | Function |
| Time | Date |
| QML::Access | Object(QObject derived) |
| QML::ListModel | Object(QAbstractListModel) |
You can customize this by implementing #to_qml method.
QML to Ruby
| QML/JavaScript | Ruby |
|---|---|
| null/undefined | nil |
| boolean | true/false |
| number | Float |
| string | String |
| Array | QML::JSArray |
| Function | QML::JSFunction |
| Object | QML::JSObject |
| Object wrapping QML::Access | QML::JSWrapper |
You can convert Objects further through QML::JSObject methods.
QML::JSObject usage
QML::JSObject is the wrapper class for JavaScript objects.
obj = QML.engine.evaluate <<-JS
  ({
    value: 1,
    add: function(d) {
      this.value += d;
    }
  })
JS

# Getter
obj.value #=> 1

# Setter
obj.value = 2
obj.vaue #=> 2

# Call method if the property is a function
obj.add(10)
obj.value #=> 11

# Subscription
obj[:value] #=> 11
obj[:add] #=> #<QML::JSFunction:...>
Load and use Qt C++ plugins
PluginLoader loads Qt C++ plugins.
It enables you to use your Qt C++ codes from Ruby easily.
// C++ - plugin example
class MyPlugin : public QObject
{
    Q_OBJECT
    Q_PLUGIN_METADATA(IID "org.myplugin.MyPlugin")
signals:
    void added(int value);

public slots:
    int add(int x, int y) {
        int result = x + y;
        emit added(result);
        return result;
    }
};
# Ruby
# The instance will be a `QML::JSObject` which represents the plugin Qt object
plugin = QML::PluginLoader.new(directory, "myplugin").instance
# Connect to signal (see http://doc.qt.io/qt-5/qtqml-syntax-signals.html#connecting-signals-to-methods-and-signals)
plugin[:added].connect do |value|
puts "added value: #{value}"
end
plugin.add(1, 2) #=> 3Use with EventMachine
You can use EventMachine with ruby-qml. It is more powerful than the default ruby-qml event loop.
Instead of using QML.run, start an EventMachine event loop by EM.run and
process QML events periodically by QML::Application#process_events.
require 'qml'
require 'eventmachine'

EM.run do
  QML.init
  EM.add_periodic_timer(0.01) { QML.application.process_events }
  QML.application.load_path(Pathname.pwd + 'main.qml')
end
You can also use em-synchrony to write callback-free asynchronous operation for ruby-qml.
require 'qml'
require 'eventmachine'
require 'em-synchrony'
require 'em-http-request'

class Controller
  include QML::Access
  property(:result) { '' }

  def get
    EM.synchrony do
      content = EM::Synchrony.sync EM::HttpRequest.new('http://www.example.com/').get
      self.result = content.response
    end
  end

  def quit
    EM.stop
  end

  register_to_qml under: 'Example', version: '0.1'
end

EM.run do
  QML.init
  EM.add_periodic_timer(0.01) { QML.application.process_events }
  QML.application.load_path(Pathname.pwd + 'main.qml')
end
Contributing
Init submodules
$ git submodule init
$ git submodule update
Install dependencies
$ bundle install
Build native extension
Before running ruby-qml in development, the native extension of ruby-qml needs to have been built. To build it, run the following commands:
$ cd ext/qml
$ bundle exec ruby extconf.rb --with-qmake=/path/to/qmake
$ make -j4
Run tests
Tests for ruby-qml is written in RSpec. To run tests, do:
$ bundle exec rspec
Run examples
$ bundle exec ruby examples/fizzbuzz/fizzbuzz.rb
Send pull requests
- Fork it ( http://github.com/seanchas116/ruby-qml/fork )
- Create your feature branch (
git checkout -b my-new-feature) - Commit your changes (
git commit -am 'Add some feature') - Write some tests
- Push to the branch (
git push origin my-new-feature) - Create new Pull Request